Difference between revisions of "Small boards"
(→Winner depending on the first move: size 9) |
(Link to KataHex) |
||
| (13 intermediate revisions by 4 users not shown) | |||
| Line 1: | Line 1: | ||
| − | Playing [[Hex]] on [[board]]s of size smaller than 10 × 10 is not very interesting, since many players will be able to play almost perfectly. However it may still be | + | Playing [[Hex]] on [[board]]s of size smaller than 10 × 10 is not very interesting, since many players will be able to play almost perfectly. However it may still be interesting for theoretical studies, and for making [[Puzzles|problems]]. |
| − | The boards of size up to five can be solved by hand. Hex on 6 × 6 has been solved by [[Queenbee]]. | + | The boards of size up to five can be solved by hand. Hex on 6 × 6 has been solved by [[Queenbee]]. The board sizes 7 to 9 have been solved with computer programs, too. |
| − | Here are the winning first moves on the small boards. [[Red (player)|Red]] is vertical and plays first. The [[Hex (board element)|cells]] | + | Here are the winning first moves on the small boards. [[Red (player)|Red]] is vertical and plays first. The [[Hex (board element)|cells]] shaded red are winning moves for red, while those shaded blue are losing. |
| − | + | ||
| − | + | ||
== Winner depending on the first move == | == Winner depending on the first move == | ||
The following boards can help you decide where you should [[swap]] when playing on small boards, and it might give you ideas of patterns for bigger boards. | The following boards can help you decide where you should [[swap]] when playing on small boards, and it might give you ideas of patterns for bigger boards. | ||
| − | |||
| − | < | + | <hexboard size="2x2" |
| + | coords="show" | ||
| + | contents="S red:all blue:(a1 b2)" | ||
| + | /> | ||
| − | < | + | <hexboard size="3x3" |
| + | coords="show" | ||
| + | contents="S red:all blue:(a1 b1 b3 c3)" | ||
| + | /> | ||
| − | < | + | <hexboard size="4x4" |
| + | coords="show" | ||
| + | contents="S blue:all red:(a4 b3 c2 d1)" | ||
| + | /> | ||
| − | < | + | <hexboard size="5x5" |
| + | coords="show" | ||
| + | contents="S red:all blue:(a1--d1 a2 a3 b5--e5 e4 e3)" | ||
| + | /> | ||
| + | |||
| + | <hexboard size="6x6" | ||
| + | coords="show" | ||
| + | contents="S red:all blue:(a1--e1 a2 b6--f6 f5)" | ||
| + | /> | ||
=== Size 7 === | === Size 7 === | ||
| − | Size 7 was first solved by [[Ryan Hayward]] using [[domination]]. | + | Size 7 was first solved by [[Ryan Hayward]] using [[dominated cell|domination]]. The proof tree can be found at http://www.cs.ualberta.ca/~hayward/hex7trees/ |
| − | < | + | <hexboard size="7x7" |
| + | coords="show" | ||
| + | contents="S red:all blue:(a1--f1 a2 b2 a3 d2 a5 b7--g7 g6 f6 g5 d6 g3)" | ||
| + | /> | ||
=== Size 8 === | === Size 8 === | ||
| − | The outcomes for size 8 were computer generated by [[Javerberg]]. The solution was | + | The outcomes for size 8 were computer generated by [[Javerberg]]. The solution was independently computer generated by Hayward et al. and appeared in [[INJCAI|IJCAI09]]. |
| − | < | + | <hexboard size="8x8" |
| − | + | coords="show" | |
| − | + | contents="S red:all blue:(a1--g1 a2--f2 a3 a4 a6 b8--h8 c7--h7 h6 h5 h3)" | |
| − | + | /> | |
| − | + | ||
| − | + | ||
| − | + | ||
| − | + | ||
| − | + | ||
| − | + | ||
| − | + | ||
=== Size 9 === | === Size 9 === | ||
| − | The outcomes for size 9 | + | The outcomes for size 9 by Jakub Pawlewicz and Ryan Hayward. |
| + | |||
| + | <hexboard size="9x9" | ||
| + | coords="show" | ||
| + | contents="S red:all blue:(a1--h1 d2--g2 a3 a7 b9--i9 c8--f8 i7 i3)" | ||
| + | /> | ||
| + | |||
| + | === Size 10 === | ||
| + | |||
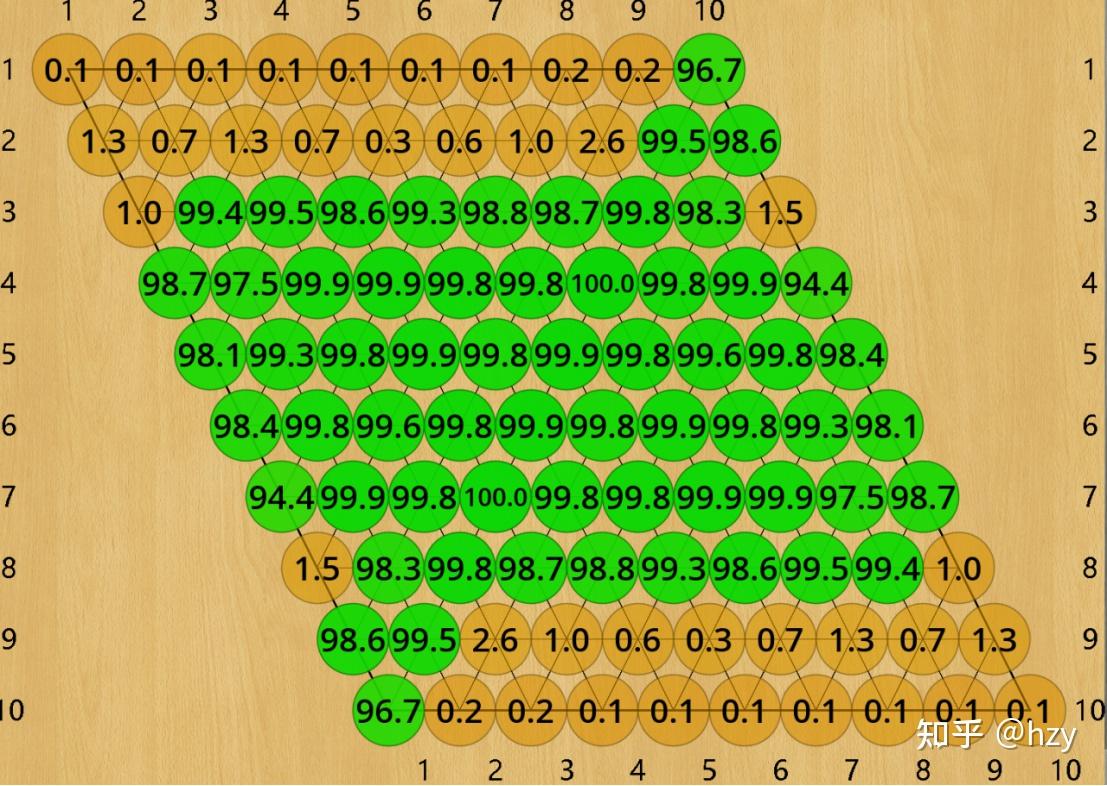
| + | The 10 × 10 board has not been solved, though one can make educated guesses from the swap maps of strong bots. In particular, according to the [https://pic1.zhimg.com/v2-43e07696b00949bb8ae177d3ddfd61c8_r.jpg swap map] of [[KataHex]], the outcomes for size 10 are as follows: | ||
| + | |||
| + | <hexboard size="10x10" | ||
| + | coords="show" | ||
| + | contents="S red:all blue:(a1--i1 a2--h2 a3 a8 b10--j10 c9--j9 j8 j3) | ||
| + | E *:(a1 b1 b9 f5 e6 i2 i10 j10)" | ||
| + | /> | ||
| − | + | Only the cells marked "*" have been proven (by humans) to be winning or losing; the other cells are not completely certain. [[KataHex]] assigns a winning probability of at least 94.4% (in self-play) for every cell it believes is winning, and at most 2.6% for every cell it believes is losing. Note this does '''not''' mean that the bot is at least 94.4% sure of each cell's outcome, only that it thinks it has a 94.4% win rate with the winning side in self-play. However, the probabilities being so close to 0 and 1 suggest the bot is quite confident in its assessment. | |
| − | + | ||
| − | + | ||
| − | + | ||
| − | + | ||
| − | + | ||
| − | + | ||
| − | + | ||
| − | + | ||
| − | + | ||
| − | + | ||
| − | + | ||
== Reference == | == Reference == | ||
| − | |||
* This [http://www.ru.is/faculty/yngvi/pdf/HaywardBJKPR05.pdf article] by Ryan Hayward ''et al.'' is a reference for 7x7. | * This [http://www.ru.is/faculty/yngvi/pdf/HaywardBJKPR05.pdf article] by Ryan Hayward ''et al.'' is a reference for 7x7. | ||
* This [[Little Golem]]'s forum [http://www.littlegolem.net/jsp/forum/topic2.jsp?forum=50&topic=338 thread] is a reference for size 8x8. | * This [[Little Golem]]'s forum [http://www.littlegolem.net/jsp/forum/topic2.jsp?forum=50&topic=338 thread] is a reference for size 8x8. | ||
| + | * This [https://webdocs.cs.ualberta.ca/~hayward/papers/pawlhayw.pdf article] by Jakub Pawlewicz and Ryan Hayward is a reference for size 9x9. | ||
== See also == | == See also == | ||
* [[Board size]] | * [[Board size]] | ||
| − | * | + | * Yang, Liao, and Pawlak designed a [https://webdocs.cs.ualberta.ca/~hayward/papers/yang7.pdf decomposition method] to find a winning strategy for Hex on small boards. |
| + | * For corresponding information on the game of Y, please visit [[Where to swap (y)]]. | ||
[[Category: Theory]] | [[Category: Theory]] | ||
Latest revision as of 14:54, 18 November 2023
Playing Hex on boards of size smaller than 10 × 10 is not very interesting, since many players will be able to play almost perfectly. However it may still be interesting for theoretical studies, and for making problems.
The boards of size up to five can be solved by hand. Hex on 6 × 6 has been solved by Queenbee. The board sizes 7 to 9 have been solved with computer programs, too.
Here are the winning first moves on the small boards. Red is vertical and plays first. The cells shaded red are winning moves for red, while those shaded blue are losing.
Contents
Winner depending on the first move
The following boards can help you decide where you should swap when playing on small boards, and it might give you ideas of patterns for bigger boards.
Size 7
Size 7 was first solved by Ryan Hayward using domination. The proof tree can be found at http://www.cs.ualberta.ca/~hayward/hex7trees/
Size 8
The outcomes for size 8 were computer generated by Javerberg. The solution was independently computer generated by Hayward et al. and appeared in IJCAI09.
Size 9
The outcomes for size 9 by Jakub Pawlewicz and Ryan Hayward.
Size 10
The 10 × 10 board has not been solved, though one can make educated guesses from the swap maps of strong bots. In particular, according to the swap map of KataHex, the outcomes for size 10 are as follows:
Only the cells marked "*" have been proven (by humans) to be winning or losing; the other cells are not completely certain. KataHex assigns a winning probability of at least 94.4% (in self-play) for every cell it believes is winning, and at most 2.6% for every cell it believes is losing. Note this does not mean that the bot is at least 94.4% sure of each cell's outcome, only that it thinks it has a 94.4% win rate with the winning side in self-play. However, the probabilities being so close to 0 and 1 suggest the bot is quite confident in its assessment.
Reference
- This article by Ryan Hayward et al. is a reference for 7x7.
- This Little Golem's forum thread is a reference for size 8x8.
- This article by Jakub Pawlewicz and Ryan Hayward is a reference for size 9x9.
See also
- Board size
- Yang, Liao, and Pawlak designed a decomposition method to find a winning strategy for Hex on small boards.
- For corresponding information on the game of Y, please visit Where to swap (y).